

Are peptides legal?: Peptides for Dummies💉
- Jun 6, 2025
- 15 min read
Updated: Dec 7, 2025

1. The History of Peptides: From Soviet Secrets to Biohacker Staples
Peptides didn’t just show up on your TikTok feed last week—they’ve been quietly reshaping medicine, aging, and performance since the mid-20th century. If proteins are the body’s symphony, peptides are its encrypted command codes—short chains of amino acids whispering specific instructions to your cells.
🧬 Early Discovery (1900s–1950s): The Origins
The term “peptide” comes from the Greek peptos, meaning “digested.” Scientists first isolated peptides as smaller fragments of proteins, noticing they carried distinct biological activity. Insulin, one of the earliest therapeutic peptides, was isolated in 1921 and revolutionized diabetes treatment—making it the OG peptide in medicine.
🔬 Cold War Biohacking (1970s–1990s): Soviet Peptide Research
While the U.S. was busy dropping creatine in Gatorade, the Soviets were running black-budget bioregulator programs using peptides to enhance recovery, cognition, and longevity in soldiers, cosmonauts, and Olympic athletes. These small sequences were extracted from organs (brain, thymus, pineal gland) and used to “restore balance” in stressed systems. Think of it as proto-biohacking… in a lab coat and ushanka.
Enter: Epitalon, Thymosin, and Cerebrolysin. Russia never stopped this research—many of today’s peptide protocols trace their lineage directly to this era.
🧫 Modern Biotech Renaissance (2000s–Now): Precision Medicine
The 2000s brought the boom in peptide synthesis tech. Labs could now manufacture ultra-pure peptides without harvesting pig glands. That’s when biohackers, bodybuilders, and functional medicine doctors started whispering about names like BPC-157, TB-500, and IGF-1 LR3.
Big Pharma caught on, too. Peptide drugs now treat everything from diabetes (GLP-1 agonists) to osteoporosis (Calcitonin) to cancer (LHRH analogs). Over 80 peptide-based drugs are FDA-approved today—with hundreds more in the pipeline.
📲 are peptides legal? The Rise of Research Peptides
Online peptide suppliers filled the gap between clinical research and mainstream adoption. Many operate under “For Research Use Only” disclaimers due to regulatory loopholes—meaning the buyer takes responsibility for any off-label use. While this wild west has led to some shady products, it’s also enabled cutting-edge experimentation for those who do it right.
TL;DR: Peptides started in labs, matured in Cold War experimentation, and are now the scalpel of modern biohacking—precise, targeted, and powerful. But to use them well, you need to understand what they do, how they work, and where the clean ones come from. And that’s what the rest of this guide is for.

2. Why Research Peptides Exist: Escaping Big Pharma’s Grip
If you’ve ever wondered how the hell peptides are being sold online without a prescription, here’s the red-pill answer: research-use loopholes are the only way to get around Big Pharma’s patent chokehold on nature.
🧬 Natural Molecules Can’t Be Patented—So They’re Ignored
Most peptides are not synthetic drugs—they’re naturally occurring molecules found in your body.Examples:
BPC-157 – derived from gastric juices
Thymosin Alpha-1 – from the thymus gland
GHK-Cu – copper-binding peptide in human plasma
Here’s the catch: you can’t patent nature. That means drug companies can’t make billions off most of these molecules—so they don’t invest in clinical trials. No trials = no FDA approval. No approval = no prescriptions.
So what happens? These powerful, well-documented peptides are left in limbo—not illegal, but not pharmaceutical. That’s where research-only peptides come in.
⚖️ The Legal Grey Area: “For Research Use Only”
To bypass this bottleneck, biotech companies manufacture peptides under the “For Research Use Only” label. This lets them sell the molecules:
Without making medical claims
Without violating FDA marketing laws
Without needing a prescription
It’s not a scam—it’s a workaround. An open channel for researchers, biohackers, and clinicians who want to explore the frontier of bioregulation without waiting 20 years for Big Pharma to greenlight it.
But here’s the catch: you take on all the risk. When you buy a research peptide, you’re not a patient. You’re a researcher. No one will tell you how to use it.
You must:
Study it
Understand the biology
Design your own protocol
If you mess it up? That’s on you. If you get amazing results? Also on you. That’s why education, community, and supplier trust are everything.
💊 Why This System Matters
If these research pathways didn’t exist, you’d never have access to 90% of the peptides people are using today. You’d be stuck with overpriced, underperforming pharmaceuticals designed around patents, not performance.
Supporting high-quality, ethical research suppliers protects this fragile ecosystem. It keeps the door open for everyone—athletes, doctors, longevity seekers, trauma survivors—anyone looking for healing outside the slow, restrictive system.
⚠️ Why Suppliers Can’t Tell You How to Use Peptides
Here’s the thing that trips up a lot of rookies: legit research peptide suppliers cannot legally tell you how to use the products.
That means:
No dosing instructions
No medical advice
No injection guides
No “this will heal your shoulder, bro”
And that’s not because they don’t know—it’s because if they do, they instantly cross the legal line into “unlicensed pharmaceutical sales.” The FDA will nuke them off the map faster than you can say “GLP-1 agonist.”
So the burden falls on you, the researcher. When you buy peptides under “Research Use Only,” you’re assuming all responsibility and liability. You’re not a patient—you’re a lab tech with skin in the game. Literally.
This is the legal loophole that allows private experimentation without needing a doctor or prescription. It's also why there’s a thriving peptide underground—because most of what actually works hasn’t made it through the slow, rigged funnel of FDA approval.
🧠 Why It’s Critical to Support Ethical Suppliers
If you value access to affordable peptides, you must support clean, compliant suppliers who:
Use ISO- or GMP-certified labs
Perform 3rd-party testing for identity and purity
Avoid illegal marketing tactics
Does not support Chinese Labs
Otherwise, the industry dies. Or worse—Big Pharma monopolizes it. You think favorite name brand weight loss peptide is expensive now? Imagine paying $1,200/month for a 5mg peptide that costs $80 to make.
Every sketchy drop-shipper and kitchen-counter peptide scam makes it easier for regulators to shut this world down.
Every smart customer who buys from vetted sources keeps the door open for everyone else.
TL;DR: Your supplier can’t legally tell you how to use peptides—that’s your job. Learn, research, connect with trusted communities, and don’t ask vendors to break the law. Support honest suppliers to keep the pipeline alive and keep Big Pharma from hijacking what should be accessible, life-changing tools.

3. Determine What You Need: The Personal Blueprint Before the Protocol
Before you jab a needle into your thigh and hope for god-mode, stop. Peptides aren't a magic bullet—they’re a scalpel. And like any precision tool, you need a blueprint before you start cutting. That blueprint is you.
This section will show you how to build a personal map using your genetics, family history, current biomarkers, and lifestyle—to figure out which peptides might actually make sense for you.
🧬 Start With the Ancestral Code: Family + Genetic History
Your first clues are upstream:
Did your parents or grandparents have autoimmune issues, cancer, diabetes, or neurological decline?
Does your family skew long-lived or burnout-fast?
Is mental illness or inflammation baked into your DNA?
This isn’t just trivia—this sets the terrain of your biological battlefield. Start mapping it out in a journal or spreadsheet.
Now take it deeper: get genetic testing through platforms like 23andMe, Genetic Genie, or Self Decode.
Look for polymorphisms in:
MTHFR (methylation issues)
COMT (dopamine regulation)
MAOA (neurochemical balance)
TNF-alpha/IL-6 (inflammation)
You’re not looking for answers—you’re building hypotheses. Your stack begins here.
💥 Methylation: The Core Engine That Fuels Everything
Methylation is like the operating system of your body—it controls gene expression, detox, neurotransmitter production, and energy metabolism.
If your methylation is jacked up, peptides won’t “land” properly. You’ll waste time, money, and possibly feel worse.
Before diving into peptides, many people need to prime their system.
Look for signs of methylation dysfunction:
Fatigue that won’t die
Overreaction to supplements or drugs
Brain fog, anxiety, insomnia
Hormone imbalances
Start with blood or organic acid tests (OAT) + DNA SNP reports. Then use targeted supplementation:
Methylfolate / Methyl B12 for MTHFR issues
TMG / SAMe / Magnesium for support
NAC / Glutathione to boost detox if needed
Peptides are fuel. Methylation is your ignition switch.
🩸 Bloodwork: Your Real-Time Dashboard
If genes are your operating system, bloodwork is your debug console.
Tests to start with:
CBC, CMP, Lipid Panel – General health markers
Vitamin D, B12, Homocysteine – Methylation & inflammation
CRP, Ferritin, Glucose, A1C – Inflammatory & metabolic load
Thyroid panel + Testosterone/Estrogen – Hormonal terrain
IGF-1 + GH markers – Growth axis readiness
Don’t just look at “normal range.” You want optimal ranges for your goals (performance, longevity, recovery, etc.).
🧪 Optional but Useful: Blood Type & Epigenetics
Some people benefit from blood type-based dietary strategies—especially O-types (high acid, low grain tolerance) and A-types (high lectin sensitivity).
BUT—don’t treat blood type like dogma. Epigenetics (lifestyle, stress, environment) override it.
Use it as a reference point, not a rulebook.
🧠 The Priming Stack Before the Peptides
You don’t paint over rust. You clean the system first.Before starting peptides, many users benefit from a short “priming phase”:
Receptor reset – Remove caffeine, nicotine, and harsh stimulants
Methylation tuning – Optimize B-vitamin cofactors and detox pathways
Adrenal & Gut Support – Use adaptogens, probiotics, and basic circadian hygiene
Nutrient repletion – Magnesium, zinc, omega-3s, etc.
Only once the system is stable should you begin your peptide protocol—stacking for regeneration, performance, or nootropic goals.
TL;DR: You are the lab. Your genetics, bloodwork, and health history tell you what to focus on. Methylation and inflammation can block peptide effectiveness, so optimize your internal systems before stacking. Research peptide success doesn’t start with the needle—it starts with knowledge.

4. Designing a Protocol: How to Stack Peptides Like a Pro
So you’ve figured out your biomarkers, methylation status, and family history. You’ve primed your system. Now what?
Now you design the protocol.
This means choosing peptides that work synergistically toward your goal—whether it’s weight loss, tissue regeneration, cognitive optimization, or looking like a genetically blessed deity on Instagram. Below are the most common stacks and their science-backed reasoning.
🔥 Weight Loss Stack
Main Targets: GLP-1, GIP, glucagon pathways, and fat metabolism
Goal: Appetite suppression, insulin sensitivity, and fat oxidation
Semaglutide (Ozempic/Wegovy) – GLP-1 agonistSuppresses appetite and slows gastric emptying. Works best to curb hunger and control binging. Most effective in those who already make dietary adjustments.
Tirzepatide (Mounjaro/Zepbound) – GLP-1 + GIP dual agonistMore powerful than semaglutide alone. Improves insulin sensitivity while also reducing hunger. Excellent for metabolic syndrome or type 2 diabetes.
Retatrutide – GLP-1 + GIP + glucagon triple agonistThe holy trinity of metabolic signaling. Especially useful for people who are insulin-resistant or have leptin resistance.
⚠️ Do NOT stack GLP-1 agonists together (Semaglutide + Tirzepatide, etc.) unless under extreme clinical supervision. Some people add Cagrilintide to complement if they stall, but this must be done cautiously due to synergistic gastric effects.
AOD-9604 – Fragment of HGH that specifically targets fat metabolism. Great for reducing abdominal fat, but only works well if paired with clean diet and movement. This is not a cheat code—it’s an amplifier.
💪 Growth + Recovery Stack
Main Targets: GH axis, IGF pathways, protein synthesis, cortisol regulation
Goal: Lean muscle, better sleep, visceral fat loss
CJC-1295 (w/o DAC) + Ipamorelin – Stimulates natural GH release, enhances protein synthesis, promotes better sleep, and regulates cortisol. Excellent for nighttime use or overall anti-aging.
Tesamorelin + Ipamorelin – Targets visceral fat more aggressively. Ideal for people cutting abdominal fat while retaining muscle.
IGF-1 LR3 – The downstream anabolic signal. Enhances localized muscle growth and recovery. Ideal post-workout or targeted injury support. Caution: Longer half-life makes it powerful, but overuse can cause desensitization.
✅ Stacking Strategy:
Start with CJC/Ipam or Tesa/Ipa as a GH secretagogue base. After 2–3 weeks of adaptation, add IGF-1 LR3 to stimulate localized growth. Use IGF-1 only in short bursts (4–6 weeks) to avoid receptor fatigue.
✨ Anti-Aging and Beauty Stack
Main Targets: Collagen synthesis, gene expression, circadian rhythm
Goal: Longevity, cellular rejuvenation, aesthetic repair
GHK-Cu – Copper peptide that promotes skin regeneration, scar healing, and even hair regrowth. Increases collagen density, reduces wrinkles, and accelerates wound repair. Topical or injectable.
Epithalon – Pineal gland peptide. Balances melatonin production, restores circadian rhythm, and lengthens telomeres. Used in Russian anti-aging clinics for over 30 years. Best in 20-day cycles, taken once or twice per year.
These two are the glow-up combo—beauty and biological age reversed at the molecular level.
🛠️ Health and Repair Stack
Main Targets: Actin regulation, angiogenesis, gut healing, anti-inflammatory Goal: Full-body regeneration and recovery
TB-500 (Thymosin Beta-4 analog) – Enhances cellular migration and systemic repair. Works well on ligaments, joints, heart tissue, and neuroinflammation. Think “general contractor” for internal healing.
BPC-157 – The “Body Protective Compound.” Speeds healing of gut lining, tendons, ligaments, and soft tissue. Can even help mood and cognition via nitric oxide modulation. Works systemically and locally.
✅ Often stacked together: TB-500 + BPC-157 = the “Wolverine stack” for deep, rapid injury repair.
🛡️ Immune + Resilience Stack
Main Targets: Thymus modulation, antimicrobial peptides, mitochondrial stability
Goal: Immunity, mitochondrial health, and inflammation control
Thymosin Alpha-1 – Enhances T-cell activity and antiviral immunity. Excellent for chronic infections, autoimmune balancing, and general immune restoration.
LL-37 – Naturally produced by immune cells. Antimicrobial and broad-spectrum antiviral. Used in experimental protocols for Lyme, mold illness, and persistent infections.
SS-31 (Elamipretide) – Mitochondria-targeted peptide. Protects the inner mitochondrial membrane from oxidative damage. Anti-aging, anti-fatigue, and neuroprotective. Rare, but powerful.
🔄 Cycling and Layering Peptides: The Strategy Behind the Stack
Peptides are signaling molecules, not drugs—you’re not taking them continuously like SSRIs or steroids.
Cycle them in waves:
4–6 week active phases
2–4 week off phases or protocol shifts
Long-term rotation for epigenetic gains
For example:
Start with 4 weeks of BPC-157/TB-500 for gut + soft tissue repair
Then shift to CJC/Ipamorelin to rebuild systemically
Later, introduce GHK-Cu or Epithalon as maintenance or glow-up phase
Immune stack? Cycle TA-1 or LL-37 during flu season or infection
This keeps your receptors fresh, your signals effective, and your results long-term.
TL;DR: Don’t throw darts in the dark. Stack peptides based on your goal and biology. Weight loss? Use GLP-1s intelligently. Recovery? Use BPC + TB. Growth? Layer CJC/Ipam with IGF. And always cycle your protocols to prevent burnout and amplify results.
5. Reconstitution & Administration: How to Prepare and Use Peptides Like a Scientist (Not a Dumbass)
Welcome to the wet lab. Time to reconstitute your lyophilized peptide—that fluffy white magic in a vial—and turn it into an injectable research solution.
Here’s how you do it step by step, with no fluff, no confusion.
💧 Step 1: What’s in the Vial?
Most research peptides come in 10mg or 5mg lyophilized powder vials. That’s the dry “cake” in the bottom.
To activate the peptide for use, you’ll add Bacteriostatic Water (BAC water)—sterile water with 0.9% benzyl alcohol to prevent bacterial growth.
The amount of water you add is called reconstitution, and it sets the concentration of the solution.
⚖️ Simple Rule of Thumb:
More water = easier math, more volume per dose
Less water = more concentrated, smaller injection volumes
So if your peptide is super high dose (like 100mg), you may only add 1mL of BAC water to keep injection volumes small.
If it’s standard (5–10mg per vial), then 3mL is the sweet spot. This makes the syringe math easy.
💉 Step 2: Tools You’ll Need
1mL insulin syringes (U100) – 30–31G, ½ inch needles. Small, nearly painless.
BAC Water – Sterile and stored in the fridge.
Alcohol swabs – Wipe tops of vials before drawing.
Peptide calculator – Like the one on our main menu
Patience and steady hands
Optional: ½ mL or shorter insulin syringes for microdoses, if your dose is tiny.
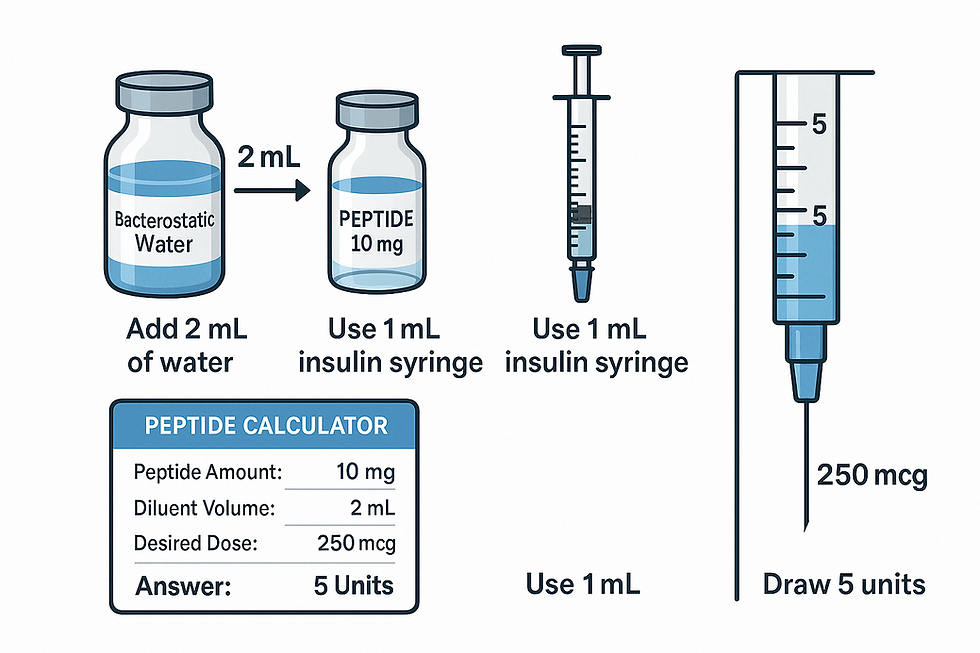
📏 Step 3: Example Calculation (Simple Math)
Let’s say you’ve got a 10mg peptide vial, and you want to dose 250mcg per injection.
1. Reconstitute:
Add 2mL of BAC water to your 10mg vial.
2. Concentration:
10mg ÷ 2mL = 5mg/mL
5mg = 5,000mcg → so that’s 5,000mcg per 1mL
3. Dose math:
You want 250mcg
250mcg ÷ 5,000mcg = 0.05mL
On a 1mL insulin syringe (which has 100 units), 0.05mL = 5 units
✅ Final Answer: Draw up to 5 units on the syringe to inject 250mcg.
🧪 Alternative Calculation for Simpler Minds
Let’s go easier:
You have:
5mg peptide vial
You add 1mL of water
So now it’s 5,000mcg per mL
You want 100mcg
100 ÷ 5,000 = 0.02mL
That’s 2 units on a 1mL insulin syringe
✅ Draw to the 2 on the syringe = 100mcg
🧠 Key Reminders
Always reference the recommended research dose on the peptide info page.
Use the calculator to plug in vial size, water added, and dose desired.
Label your vials after reconstitution with date + mg/mL
Store peptides in the fridge after mixing. Don’t freeze.
TL;DR: Add 1–3mL BAC water to your peptide vial depending on how concentrated you want it. Use a 1mL insulin syringe. Calculate the dose based on how much peptide is in each mL. Draw that volume in units (1mL = 100 units). Easy.
How to Inject Subcutaneously (SQ): Step-by-Step Injection Protocol
Whether it’s your first time or your 50th, injecting peptides properly is a skill. Done right, it’s nearly painless, extremely effective, and makes you feel like a legit home-lab operator. Here's the full method from water draw to skin poke, with all the best practices.
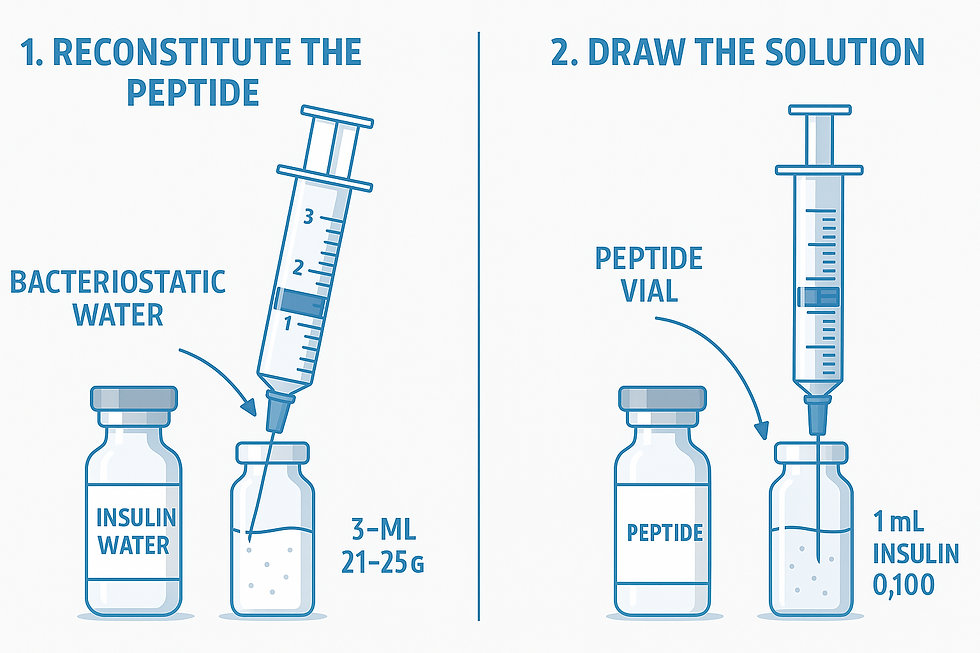
🧪 Step 1: Reconstitute the Peptide
You’ll need:
Bacteriostatic water
3mL syringe with 21–25G needle (for drawing water)
Peptide vial
Alcohol wipes
How to:
Wipe the top of the BAC water and the peptide vial with alcohol.
Use your larger 3mL syringe to draw out the water (e.g., 2mL).
Insert the needle into the peptide vial at a slight angle, not straight down—this helps avoid damaging the rubber stopper and directs water gently down the side.
Slowly inject the water along the wall of the vial—not directly into the powder cake.
Gently roll the vial between your fingers to dissolve the powder. Do NOT shake—it can denature delicate peptides.
💡 Tip: You’ll feel vacuum pressure suck the water in—don’t fight it. Let it pull the water naturally.
💉 Step 2: Draw the Reconstituted Peptide
Now you’ll draw the mixed solution into a 1mL insulin syringe (U100)—these are made for subcutaneous injections and have precise unit markings.
How to:
Wipe the peptide vial top again.
Insert the insulin syringe at a 45-degree angle—this helps maintain the vacuum and avoids coring the rubber stopper.
Pull the plunger back to your calculated units (e.g., 5 units = 250mcg if you followed the previous setup).
Check for air bubbles. Tap the syringe gently with your finger if you see any, and push out a tiny amount to clear the air.
💡 Pro Tip: Tilt the vial slightly when drawing to keep the needle tip in the fluid. Don’t let it suck air from the top.
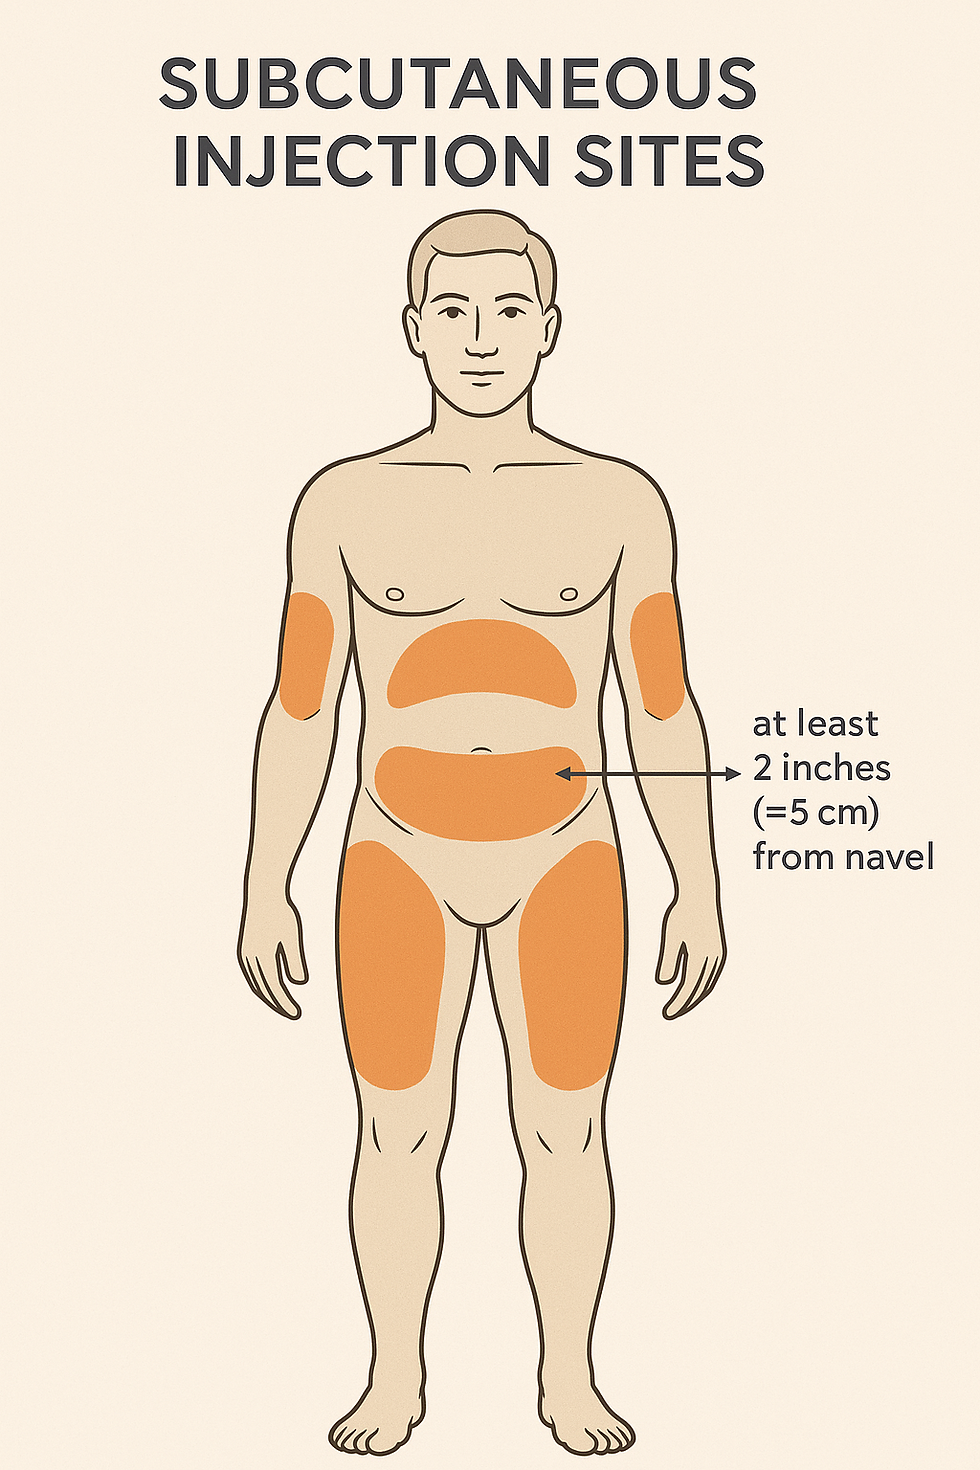
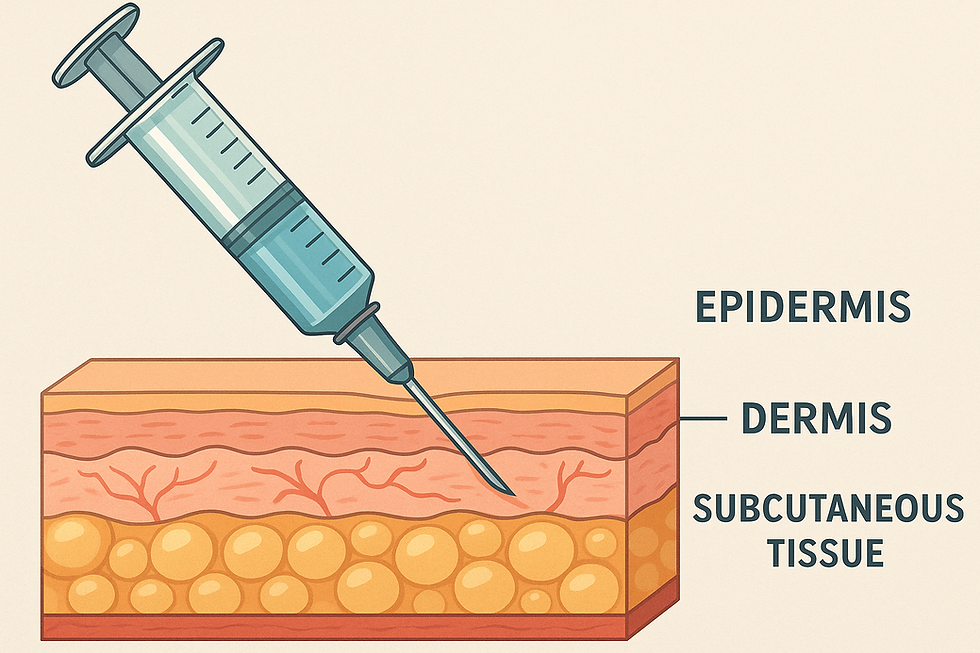
🧬 Step 3: Inject the Peptide Subcutaneously
You’re injecting into subcutaneous fat, not muscle. Best injection sites:
Lower belly fat (stay at least 2 inches from navel)
Outer thighs
Back of the arms (less common unless someone’s helping you)
How to:
Use an alcohol pad to clean the injection site.
Pinch a fold of skin between thumb and forefinger—this separates the fat from muscle.
Insert the needle at a 45–90 degree angle (shorter needles = 90°, longer ones = 45°).
Inject slowly and steadily.
Withdraw the needle and press with a sterile pad—don’t rub.
🔄 Bonus Tips: Rotation & Technique
Rotate sites daily to avoid scar tissue or irritation.
If you're bruising, you may be going too fast or hitting capillaries—slow it down and try new angles.
Store syringes in a sterile, dry area.
Dispose of used needles in a sharps container—don’t throw them in the trash.
If you have to inject more than 1mL, split into two injection sites.
🚫 What NOT to Do
Don’t inject directly into muscle unless it’s specifically an IM peptide
Don’t reuse syringes
Don’t skip alcohol swabbing, even if “it looks clean”
Don’t shake your vial
Don’t inject into the same spot repeatedly
TL;DR: Draw water with a big syringe. Reconstitute gently. Use an insulin syringe to pull up your dose, clear the air, and inject into fat—not muscle. Pinch, poke, inject, rotate. You’ll be a pro in two tries.

6. Proper Storage: Keep Your Peptides Potent
Peptides are delicate. These aren’t multivitamins or pre-workout powders—they’re fragile chains of amino acids that break down under heat, light, or contamination. If you want results, you’ve got to store them like a pro.
🧊 Before Reconstitution (Still in Powder Form)
Refrigeration is preferred but not required for most peptides in powder form.
Cool, dry place = acceptable short-term (under 30 days).
Store at 2–8°C (35–46°F) for max shelf life (6–12 months).
💡 Tip: Keep vials in a sealed Ziploc bag with a desiccant pack if not refrigerated.
💧 After Reconstitution (Water Added)
MUST be refrigerated at all times.
Shelf life: 30ish days once mixed with BAC water. (5 Hours for MOTS-C)
Do not freeze after reconstitution unless specified (some freeze-drying methods break down with freezing).
⚠️ If it looks EXTREEMLY cloudy or smells odd after mixing? Toss it. A little bit of snow is ok.
⚠️ General Storage DOs & DON'Ts
✅ DO:
Wipe vial tops with alcohol before every draw
Keep light exposure minimal
Label vials with date of reconstitution
Keep BAC water refrigerated after opening
❌ DON’T:
Leave reconstituted peptides at room temp overnight
Store near heaters, windows, or in gym bags
Use tap water or saline—only sterile BAC water
TL;DR: Before mixing = cool and dark. After mixing = fridge only. Peptides are fragile—treat them like medicine, not supplements.
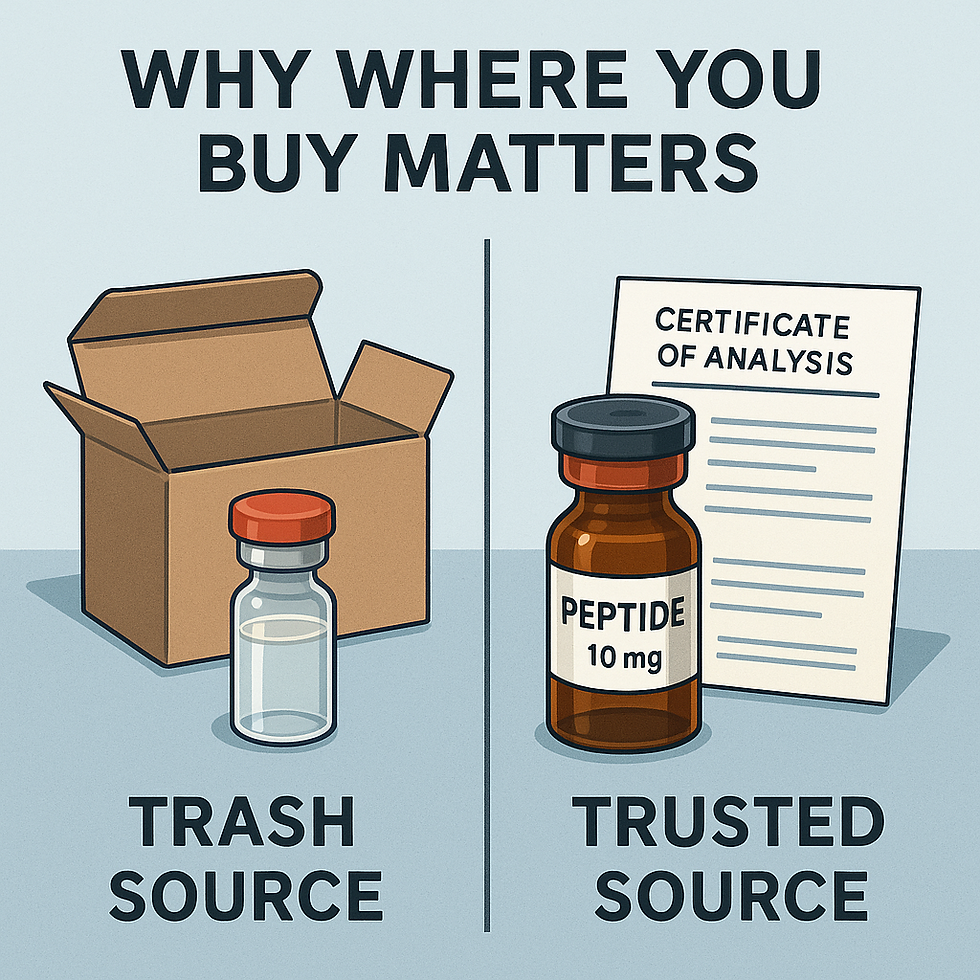
7. Why Where You Buy Peptides Matters: The Source Is Everything
Peptides are only as good as the lab that makes them—and most of the labs out there are not pharmaceutical-grade. The truth is, the majority of research peptides on the market today come from unverified Chinese suppliers, with zero documentation, zero third-party testing, and a high chance of being contaminated, mis-dosed, or straight-up bunk.
Let’s break down why sourcing matters and how to tell clean from dirty.
🧪 What Happens With Cheap Peptides
Buying from shady websites or TikTok clowns leads to:
Impurities like heavy metals, solvents, and leftover resin
Mislabeling (your "10mg" vial might be 4mg... or 0mg)
No sterility, risking bacterial infections
Fake COA (Certificate of Analysis) to confirm identity or purity
That’s not just bad science—it’s a fast track to damaging your health.
✅ What to Look for in a Legit Supplier
A real peptide source will have:
ISO or GMP-certified labs (EU or USA)
HPLC & Mass Spec testing
Amber vials (Chinese labs use clear)
Tamper-evident caps + labeled dates
Professional storage
If your supplier can’t show you 3rd-party testing, walk away.


Comments